Science Experiment: Underground Water
This science project is great for all ages to understand what happens to rain water!
Setting the Scene: Northeast Florida’s Primary Water Source Lies Underground
Florida gets most of its drinking and irrigation water from groundwater sources. In some places underground, deep layers of rocks, known as bedrock, have pockets and caverns where water collects. Water moves underground from cavern to cavern through cracks in the bedrock. Some layers of rock act like sponges, soaking up water. These water-saturated rocks and caverns act as underground reservoirs, and they are called aquifers. Early on, people learned to dig a well into an aquifer to draw up cool, clear water.
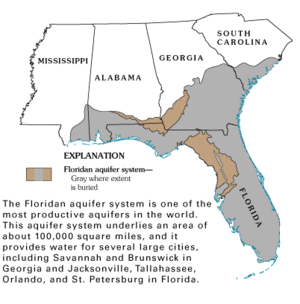
The Floridan aquifer lies under all of Florida and parts of Georgia, South Carolina, and Alabama, covering about 100,000 square miles. It is one of the most important aquifers in the world because it supplies large cities, thousands of small communities and farms, orange groves, and other valuable crops. Geologists divide it into two layers. The Upper Floridan contains water close to the surface and requires only shallow wells. The Lower Floridian lies deeper in the bedrock, and it requires deeper wells.
The people living in northeast Florida began using wells to withdraw underground water around 1880. At first, they could use shallow wells, but as more cities withdrew more water, the aquifer level began to sink, so the people needed deeper wells. In the 1930s, paper plants, mining operations, and citrus-processing plants used underground water. Aquifers supplied 630 million gallons per day in 1950 and, by 1980, the growing population and agricultural industry withdrew 3 billion gallons per day.
The Basic Science: Aquifers, Runoff, and Wells
Aquifers form when water seeps (percolates) through the ground into underground rocks that hold water. The layers above the aquifer are permeable, which means they allow water to pass through. The rocks that store the water are porous, meaning they have tiny spaces in the grainy stones that fill with water like a hard sponge. The ground above the Floridan aquifer is highly permeable and has buried caverns that formed ages ago. The rocks in the aquifer are limestone and dolomite (which contains fractures or breaks). Both rock types dissolve easily, enlarging the pores between the grains of limestone and the fractures. Great expanses of these underground rocks soak up large amounts of water.
 The above-ground area where water seeps into the aquifer is known as the recharge area, and we must all take care not to pollute it! Aquifers normally remain untouched by the natural pollution that can enter surface water: streams, lakes, and oceans. Layers of sand, gravel, and rock filter out the dirt and microorganisms as the water seeps below ground. As a rule, deeper aquifers have very clean water. Modern day living, working, and farming, however, produces pollutants that can dissolve and contaminate aquifers, especially shallow ones like the northeaster portion of the Floridan aquifer. Oil, gas, paint thinners, industrial waste, agricultural fertilizers and pesticides sometimes make their way into our aquifers.
Almost all of Florida is a recharge zone for the Floridan Aquifer.
Sipping from Aquifers
If you walked around your community 200 years ago, you would probably come across bubbling springs seeming to come from nowhere. The Floridan aquifer came so close to the surface that its water could sometimes flow in a stream or burst into a small fountain. The springs and fountains would come and go, depending on the amount of recent rainfall. During a drought, the aquifer level would sink lower and the springs would dry up temporarily.
You can build a model of an aquifer and test the rise and fall of its water table (the level the water rises to) in different earth layers.
Build a model aquifer
Suggested Materials:
- clear plastic rectangular tub
- sand, aquarium gravel, pebbles, rocks
- floral clay or some other impermeable material
- clamp to close the drain
- clear silicone sealant to seal the opening around the drain
- measuring cups
- devices to add water to the aquifer (spray mister, watering cans with and without sprinkler)
- food coloring (optional)
- water
- a basin for collecting drainage water
- lab book for designing your experiments and recording your data and observations

Overview of Project
- Use a clear plastic tub that you can cut a drain hole in and build up materials representing different underground layers of earth and rock.
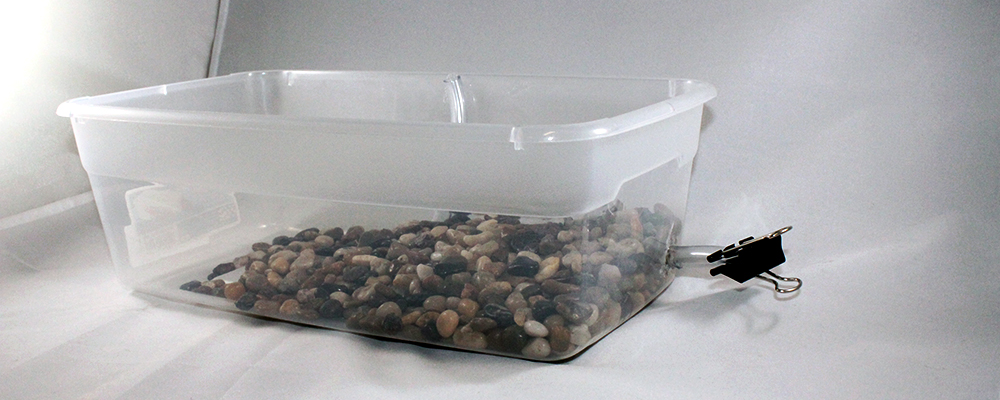
- To manipulate the water table level, put a drain in the bottom side before you begin putting material in the container. The drain will allow you to test how recharge and withdrawal rates affect the aquifer’s water level. One way to install a drain is to drill a small hole in a corner of the plastic tub, then use clear silicon caulk to seal a length of clear plastic tubing into the hole. Leave a few inches of tubing on the outside of the tank, and clamp it shut with a binder clip.

- By capturing the water that drains out of your model aquifer, you can measure the amount of withdrawal.
- Place stones around the opening of the tube (inside the tub) so the drain does not become plugged with sand.
- With the drain closed, build your aquifer. Use clean sand, floral clay, and different sizes of rocks, pebbles, and gravel to create different layers. Do not use soil because it will make the water too dirty and cloudy for you to make accurate observations.
- Shape the materials to create hills and valleys. The valleys will become ponds when the water table rises.
- Use impermeable material, such as the floral clay or a flat stone, to observe how an obstacle affects the water flow in the aquifer.
- To observe the water level, build a well by securing a straight piece of clear tubing to the side of the plastic tub. The tube will stay full to the level of the “water table.”
- Add a measured amount of colored water to the surface of the aquifer, and observe the water percolating through the layers. Record your observations.
- Measure the level of the water table.
- Open the drain and observe the flow of water out of the aquifer. Capture and measure the amount of water that drains out each time you fill and drain the model. Are you able to capture all of the water that you added?

Ideas for Investigations
- Find a way to connect your project to a real situation in Florida, such as a drought that reduces the recharge rate or an increase in population or irrigation. Perhaps you could research the geology of a particular area in your region and try to simulate it in your model.
- Think of a set of questions you can explore with the model. Here are just a few suggestions:
-
- Does water seep through different materials at different rates?
- How does the amount of water added to the “recharge area” (the surface) compare to the amount of the “withdrawal”?
- What effect does an impermeable layer have on the flow of water through the aquifer?
- Develop hypotheses about these questions and write them in your lab book.
- Design an experimental procedure for testing those hypotheses, and explain your design in your lab book. Think about:
-
- Which conditions and variables will you modify for different stages of your project?
- How you can set up a control to use as a comparison yardstick?
- What will you need to measure and observe?
- Design a data recording system.
- After conducting your projects, produce diagrams, graphs, or charts to illustrate the results.
- Describe the conclusions you draw from these results.
Putting it Together
Make a visual display that demonstrates your explorations of an aquifer. Prepare a report or presentation that will explain your display.
Extenders
Percolation
Go to a gardening supply store and ask for different comparison samples, about a cup each of gravel, sand, perlite, topsoil, or other similar materials.
If the materials feel moist, bake them in the oven or put them in the sun for a while.
Put triangular coffee filters in three large funnels. Add each material to a different funnel. Pour one cup of water into each funnel (held over a container) and time the amount of time required for the first drops water starts to leak through the end of the funnel.
How long does it take for the water to stop dripping? Repeat this procedure with the other materials. Graph your results and write a description of the materials’ permeability. Which of these materials would be best in an aquifer? Why?
The Florida Connection
Do you want to know where wells are located in your area and whether they are threatened by pollution?
Search the Internet to find maps of the Floridan aquifer and the locations of wells in your area. Then find topographical, geological, and land use maps covering the same area. Where are potential sources of pollution? Could those pollutants be over recharge areas for the aquifer? Research whether there are procedures in place to protect the aquifer’s water quality. Can you find information about water quality of the water from those wells?
Explore Solutions and Save
Learn about all the ways JEA helps Northeast Florida families, businesses and our community thrive and how we can help you do more.